
So you tried making roti, and instead of puffed-up clouds, you ended up with flat discs. Been there, done that. If you’ve ever watched someone’s roti swell up like a balloon and wondered why yours stay sad and flat, you’re not alone. Thing is, getting roti to puff isn’t about luck or having some mystical grandma in the kitchen. It’s about nailing a few small details that most people miss.
The biggest culprits? Usually the dough, how you roll it, and the heat. Let’s break it down so you can actually fix it, not just pray for better rotis next time. No patience for vague advice? Good, neither do I. Let’s get straight to what actually helps, so you can stop poking at sad, flat rotis and start serving up the real deal.
- The Real Role of Dough in Puffing
- Rolling Tricks That Actually Matter
- Hot Griddles and Heat Secrets
- Troubleshooting: Common Mistakes and Quick Fixes
The Real Role of Dough in Puffing
If your roti isn't puffing, most of the time, the blame sits squarely on the dough. People think it's all about rolling or fancy techniques, but you can usually trace problems right back to your dough's texture. Get this step wrong, and flat roti is all but guaranteed.
The key? The right blend of flour, water, and just enough kneading. Good roti dough feels soft like your earlobe and never sticks to your hands. Aim for a dough ball that bounces back gently when poked. Using cold water makes dough tight and tough—always go for warm water, which helps gluten form better, giving you that stretchy, puffy finish.
Here’s a quick cheat sheet on dough texture and hydration:
| Sign | What Went Wrong | What to Do |
|---|---|---|
| Cracks & stiffness | Too little water or over-kneading | Add more water; knead less |
| Sticky mess | Too much water or under-kneading | Add flour; knead longer |
| Dough keeps shrinking | Didn’t rest the dough | Cover and rest for 20–30 min |
Wheat flour matters, too. For true Indian roti, skip all-purpose flour. Use "atta"—a finely milled whole wheat flour. This gives rotis their signature chew and puff. Check the label; regular whole wheat or bread flour acts different and can lead to poor puffing and rubbery bites.
Once you’ve mixed and kneaded, resting is not optional. It relaxes the gluten, so your dough isn’t tough. Cover with a damp towel and set aside for 20–30 minutes. Trust me, that rest is the difference between chewy, flat roti puffing flops and those glorious, airy results you crave.
- Use around 150 mL (a little more than half a cup) of warm water per cup of atta flour for best hydration.
- Don’t use oil in the dough if you want a big puff. Add it only after the dough is almost ready—just a drizzle for a softer surface.
- Divide dough balls right before rolling to keep them from drying out.
If you get the dough right, you’re already halfway to perfect, puffy rotis—don’t skip these steps, or you’ll just end up chasing your tail trying to fix them at the stove.
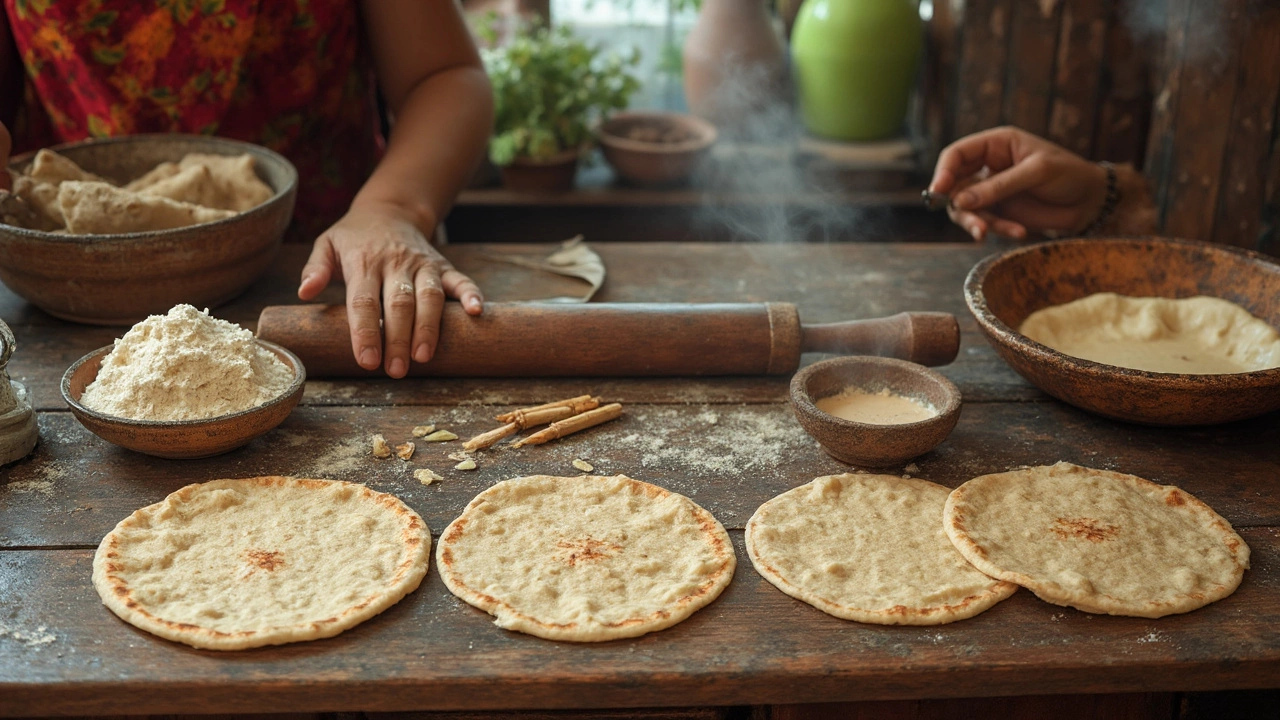
Rolling Tricks That Actually Matter
Getting your roti puffing comes down to how you roll it. Even if your dough is on point, a poorly rolled roti will not puff no matter how much you hope. Here’s how to make rolling actually work for you instead of against you.
First off, keep the thickness even. If one spot is thick and another is thin, the steam won't spread evenly and your roti will puff oddly—or not at all. You want every part to be about the thickness of a nickel, give or take. Stack a few coins together if you need a reference, seriously. It helps at the start.
Don’t use too much dry flour when rolling. Sure, flour keeps the dough from sticking, but if you use piles of it, the roti gets dry and tough and will never puff up nicely. Lightly dust the board, and shake off any extra flour once you’re done rolling each round.
Shape matters too. Try to get your roti as round as possible. Wonky shapes mean uneven cooking, and that means uneven puffing. Twist the dough a quarter turn after every few rolls instead of just flattening it in one direction. This keeps your circles, well, circular.
- If you get cracks on the edges while rolling, your dough is probably too dry. Add a little water to the next dough ball and knead it again before rolling.
- If you press too hard, the roti becomes dense. Use light, even pressure and don’t flatten it to death—just enough to spread it out.
- After rolling, don’t let the discs sit for too long before cooking. They can dry out and lose their ability to puff. Cook soon after rolling for best results.
One more thing—practice makes a real difference here. The more you roll, the better your hands get at feeling out what’s right. Don’t stress about perfection; focus on making each one a little better than the last, and soon puffing rotis will be your new normal.
Hot Griddles and Heat Secrets
If you want your roti puffing up perfectly, your pan (or tawa) needs to be hotter than you probably think. Skimping on heat is the quickest way to get a flat, dry bread. Here’s what actually matters with heat:
Your pan should be fully preheated before the first roti ever touches it. To test, sprinkle a few drops of water—if they sizzle and evaporate in under 2 seconds, you’re good to go. Too cold, and your roti will just dry out instead of puffing up. Too hot, and it’ll burn before it cooks through.
Most experienced cooks use a medium-high flame on gas stoves, or set their electric stove to around 375°F (190°C). Here’s a quick reference chart if you’re tired of guessing:
| Type of Stove | Ideal Heat Level | Expectations |
|---|---|---|
| Gas | Medium-high | Quick puff, slight brown spots |
| Electric | 375°F (190°C) | Even heating, don’t overcrowd |
| Induction | 190°C | Stable heat, watch for sticking |
Another tip—never put oil or ghee on the pan before cooking. Rotis cook dry. If you want that buttery flavor, brush them with ghee after cooking. Grease on the pan ruins the puff.
Timing is another hidden factor. Don’t flip your roti back and forth a bunch of times. Here’s the basic game plan that works for most people:
- Place rolled roti on the hot pan. Wait until you see bubbles form (about 30 seconds).
- Flip once. After another 25-30 seconds, small darker spots appear.
- Now, flip again or press gently with a clean cloth or spatula. This part makes the roti puff up like a balloon. If it’s not puffing, the heat’s usually too low, or the dough is too thick.
For folks with gas stoves and some confidence, after the second flip, remove the pan and place the roti directly on the open flame for 2-3 seconds. This makes it puff dramatically—just watch it closely to avoid burning.
If you batch-cook, don’t stack fresh rotis in a totally open plate. Put them in a covered container or cloth-lined basket to keep them soft.
Summing up: keep things hot, get your timing down, skip the oil, and respect the process. That’s how you move from sad, flat bread to seriously good, puffy rotis.
Troubleshooting: Common Mistakes and Quick Fixes
Roti not puffing? You’re probably dealing with one or more of the classic goof-ups. Here’s how to spot them and what to do instead—no need for a chef’s degree or fancy tools.
- Roti puffing is nearly impossible if your dough is too tight (stiff) or too loose (sticky). If it’s cracking while you roll it, it’s too dry. Add a splash of water and knead again. If it’s sticking to your fingers and rolling pin, sprinkle a bit more flour and knead till it’s smooth.
- If you roll the roti too thin or uneven, air can’t get trapped. For puffing, you want even, medium thickness—about the same as a nickel coin. If one part is thinner, it’ll burn or dry out before the rest puffs.
- Not resting the dough makes a big difference. Honestly, 15-20 minutes of rest is non-negotiable. That’s when gluten gets stretchy and helps with puffing.
- The pan (tava) must be hot enough but not blazing. A cold pan gives you chewy, un-puffed rotis. Drop a few drops of water on your pan; they should instantly sizzle and dance – that’s your cue the heat is right.
- Flipping the roti at the right time matters. Wait until you see light brown spots on the underside, then flip. Too early, and the dough tears; too late, and it gets stiff.
Here’s a quick reference table for the most common mistakes and what to do about them:
| Mistake | What Happens | Quick Fix |
|---|---|---|
| Dough too dry | Cracks; roti stays flat | Add water, knead more |
| Dough too sticky | Hard to roll; sticks to everything | Add flour, knead till smooth |
| Uneven rolling | One side puffs, other stays flat | Check thickness; adjust pressure on rolling pin |
| Cold pan | Roti turns hard and flat | Increase heat; test with water drops |
| No dough rest | Chewy, non-puffy roti | Rest dough 15-20 min |
Last thing—don’t stress over perfection. Sometimes, the first roti is a dud because the pan isn’t hot enough. Scratch that one and keep going. Practice really does make puffing easier.